I have spend the last weekend in wonderful Berlin with my mother and my sister. And just like Berlin was divided in east and west, I have been experiencing 2 different sides of Berlin - the modern side in the everyday picture of Berlin and the historical side in the museums and of course in the grafitti covered Berlin wall that stretches through the city. This is my impression of the modern Berlin in pictures:
Wednesday, 23 July 2014
Wednesday, 9 July 2014
Simple dress makeover
I'm going to Berlin this Saturday, and I needed an easy little dress to come with me. I didn't feel like making one from scratch, so I took my mothers old dress, did a quick makeover, and the finishing result is now lying on the bottom of my suitcase.
It's really easy to transform one of your (or your mothers) old dresses, so before you just throw it away, scroll down and find out how you can turn it into this:
This is a very regular step in the refashion process, and fortunately it's really easy.
1. Measure and cut the dress in the desired length + 3-4 cm extra
2. Hem it!
- An easy tip is to roll the fabric twice instead of just one time, so you get a double hem. This will prevent the fabric from wrinkling, and give you a nice and even hem.
- When sewing the hem, you can just sew a straight stitch all the way around because it's a double hem. If it's a single hem, you have to overlock the edge before you hem it.
"Fitting the dress":
As you can see on the picture below, the dress was too big around the waist, so it needed to be fitted.
Usually I would fit a dress by wearing the dress inside out and pinning it on each side of the dress, so it fits the body. But since this dress isn't elastic at all, I would need to put a zipper in it, to be able to get it over my hips.
I was way too lazy to do this, So instead I used the piece that I cut of the dress, and made a waist band out of it.
It's really easy to make a waistband, but since it suddenly get's all complicated when I'm trying to explain how to do it, I will let wiki how learn you how to sew a waistband.
I love giving old clothes new life, so I will definitely be posting more refashions.
In the meantime, you can take a look at this blog - http://refashionista.net/, where there are hundreds of examples on how to give all sorts of clothing a fun makeover!
Saturday, 5 July 2014
Danish Design Talent Prize
In the competition for the Danish design talent prize, 4 upcoming designers get chosen to create a mini collection, with a danish musician as a muse and a danish established designer as a mentor.
Last years winner was one of my favourite danish designers - Anne Sofie Madsen.
She had Charlotte Eskildsen from Designers Remix as a mentor, and she designed for Oh Land (who also is on the pictures).
This is some of the looks from the amazing mini collection she made:


This years nominees are:
From left top to right bottom, and in order of:
Designer
- mentor
- muse
Freya Dalsjø
- Ivan Grundahl
- Coco O from Quadron
Mark Kenly Domino Tan
- Baum und Pferdgarten
- Darkness Falls
Trine Lidegaard
- Christian Stadil
- Kidd
Kjetil Aas
- Bjørn Bruun
- Sivas
Monday, 30 June 2014
Portrait photoshoot
Sorry I haven't been writing for a while. I have had my final exam last week, and of course been celebrating the fact that I am now a high school graduate!
This is a photoshoot that I made with my friend Sofia, which I also made the figureskating dresses for - which you can watch here.
We just experiemented with lots of different poses, and actually we think that it turned out really well, and it's an alternative way to shoot portraits.
Friday, 20 June 2014
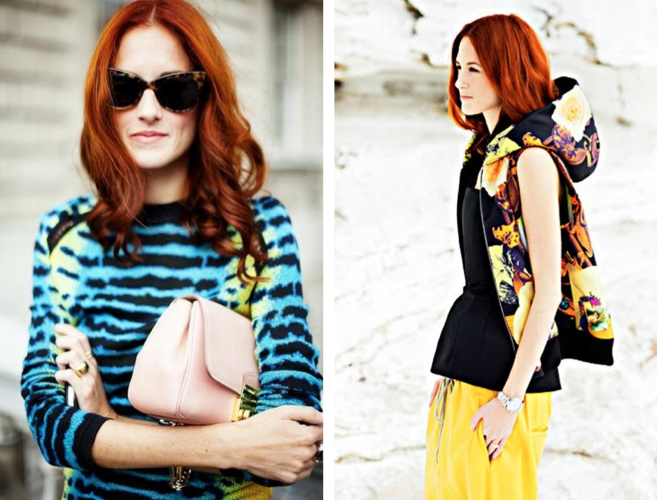
Styleicon - Taylor Tomasi Hill
Taylor Tomasi Hill is a style icon that really inspires me, which is probably due to the fact that she is a former style editor at Teen Vogue and US Marie Claire, and currently working as the creative director at Moda Operandi.
She has a really unique style that sometimes surprises you, like when she wore a quite romantic patterned dress - with giant spikes on the shoulders!
She manages to take extremely cool pieces of clothing, and style them to perfection, so she always looks elegant and exiting.
Theese are some of my favorite looks of her:
She has a really unique style that sometimes surprises you, like when she wore a quite romantic patterned dress - with giant spikes on the shoulders!
She manages to take extremely cool pieces of clothing, and style them to perfection, so she always looks elegant and exiting.
Theese are some of my favorite looks of her:
Saturday, 14 June 2014
DIY - recipe book
My sister has been interested in healthy food for a long time, which now has resulted in a blog - basicallyfruitytarian. The blog consists of recipes of healthy, but still very delicious, meals that I am so lucky to taste almost every day. I especially can't get enough of the banana bread :-)
A while ago she bought a simple journal where she could write all of her genius recipes down. But the journal looked so boring, that I had to spice it up a bit:
What you will need:
- some magazines with cool pictures, that are relevant to your journal
- cardboard
- the journal itself

A while ago she bought a simple journal where she could write all of her genius recipes down. But the journal looked so boring, that I had to spice it up a bit:
What you will need:
- some magazines with cool pictures, that are relevant to your journal
- cardboard
- the journal itself
Since it's a recipe book, it's a good idea to buy a journal with a plastic "cover", so the beautiful front-page you make won't be messed up by tomato sauce.
Cut out the pictures you choose, and remember to have both big and small pictures.
Cut out the letters, that are going to spell the name of your journal, and draw along the edges of the letters with a marker. This makes them seem more finished.
Now you just have to glue the pictures an the letters to the cover of the journal. You can experiment with the layout as much as you want to, but remember to use the larger pictures as a base.
And then you're done :-)
Monday, 9 June 2014
Maxi skirt from "leftovers"
As I have mentioned before, I have been given a big bag of leftovers from different fashion companies.
I have already made some scarfs of the leftovers, which you can see here.
Some of the fabric pieces, are so big though, that I would never have called them leftovers myself.
This included a beautiful silk fabric, which I thought would be perfect for a simple maxi skirt.
And since you'll need a LOT of fabric to make a maxi skirt, that is wide enough so it doesn't prevent you from walking properly, I decided to make a split in the middle.
Since the split starts at the very top of the skirt, I also made a mini skirt from a pastel pink leftover fabric to go underneath. Here's the result:
I have already made some scarfs of the leftovers, which you can see here.
Some of the fabric pieces, are so big though, that I would never have called them leftovers myself.
This included a beautiful silk fabric, which I thought would be perfect for a simple maxi skirt.
And since you'll need a LOT of fabric to make a maxi skirt, that is wide enough so it doesn't prevent you from walking properly, I decided to make a split in the middle.
Since the split starts at the very top of the skirt, I also made a mini skirt from a pastel pink leftover fabric to go underneath. Here's the result:
Subscribe to:
Posts (Atom)